Next13 동적 라우트 params, body, 응답, nextauth (기존 vs Next13 비교)
목차
1. 기존 api 라우트 방법 vs Next13
2. 기존 dynamic route params 가져오는 방법 vs Next13
3. 기존 응답 방법 vs Next13 ( req.json(), searchParams 사용법 )
4. nextauth 적용 방법
1. 기존 api 라우트 방법 vs Next13
기존 방식
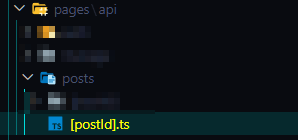
src/pages/api 폴더 내에 생성한 폴더와 파일 구조로 api 라우팅을 할 수 있습니다.
'http://localhost:3000/posts/10'이 주소로 'GET'이나 'POST' api 요청을 보내면 됩니다.
[postId].ts 파일 내부에서는 if 문을 통해서 요청 방식에 따라 분기를 나눕니다.
const handler = async (req: any, res: any) => {
  if (req.method === "GET") {}
  //...
}
Next13 방식

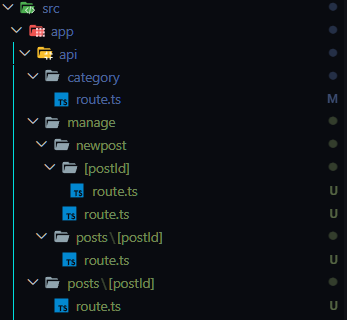
src/app/api/ 폴더 내에 생성한 폴더와 파일 구조로 api 라우팅을 할 수 있습니다.
방식은 동일하지만 위치가 app 폴더 내부로 바뀌었습니다.
'http://localhost:3000/posts/10'마찬가지로 위와 동일한 주소로 api 요청을 보내면 됩니다.
[postId].ts 파일 내부에서는 분기를 만드는 대신에 GET, POST라고 명명한 함수를 만들면 됩니다.
export const GET = async (req: NextRequest, res: Response) => {
  //...
};

export const POST = async (req: NextRequest, res: Response) => {
  //...
};
리팩토링한 api 라우트 폴더 구조 예시
2. 기존 dynamic route params 가져오는 방법 vs Next13
기존 방식
res.query로 아래와 같이 가져올 수 있습니다.
const handler = async (req: any, res: any) => {
  const { postId } = req.query;
  //...
};
Next13 방식
공식적으로 요구하는 방법인지는 모르겠습니다.
Next13에서는 NextRequest라는 속성을 이용하게 되는데 req: NextRequest 에는 이 params 라는 속성이 없어졌습니다.
req 를 출력해보면,
  console.log(new NextRequest(req), "NextRequest");

  ```
  NextRequest {
    url: URL {
      href: 'http://[::1]:3000/api/posts/10',

      pathname: '/api/posts/10',

      searchParams: URLSearchParams {},

      'x-invoke-output' => '/api/posts/[postId]',
      'x-invoke-path' => '/api/posts/10',

    url: 'http://localhost:3000/api/posts/10'
}
```
이러한 속성들이 있는데 딱 꼬집어서 params 를 제공해주고 있지는 않습니다.
결론: 두번째 인자에 params가 있습니다.
export const GET = async (req: NextRequest, { params }: Params) => {
  const { postId } = params;
  //...
};
두번째 인자를 출력해보면 찾아 헤메던 params를 찾을 수 있습니다. 제 눈으로는 req에서는 안보이네요.
{ params: { postId: '10' } }
혹시나 궁금하실 분들을 위해 Params 타입은 이렇게 작성했습니다.
interface Params {
  params: {
    [key: string]: string;
  };
}
3. 기존 응답 방법 vs Next13
기존 방식
const handler = async (req: any, res: any) => {
  if (req.method === "GET") {
    //...
    return res.status(404).json({ message: "Not found any post" });
  }
};
res.status 로 스테이터스와 데이터를 응답하면 됩니다.
Next13 방식
export const GET = async (req: NextRequest, { params }: Params) => {
  return NextResponse.json({ error: "Internal Server Error" }, { status: 500 });
};
NextResponse 객체로 응답할 수 있습니다.
NextResponse를 출력해보면 status를 설정하거나 cookies 설정을 할 수 있습니다.
  console.log(new NextResponse(), "NextResponse");

  ```
  NextResponse {
    status: 200,

    cookies: ResponseCookies { _parsed: Map(0) {}, _headers: [HeadersList] },

}
```
cookies
redirect()
json()
redirect()
rewrite()
next()
https://nextjs.org/docs/app/api-reference/functions/next-response
이런 메서드들이 존재하며 json() 사용법만 알아보자면,
export const GET = async (req: NextRequest, { params }: Params) => {
    return NextResponse.json(post, { status: 200 });
};
첫번째 인자에 data를 전달하고, 두번째 인자에 status를 정해줄 수 있습니다.
추가로 searchParams 사용 방법입니다.
'?_id=abcd1234'서치 쿼리 값을 가져오는 방법은 다음과 같습니다.
  const { searchParams } = new URL(req.url);
  const _id: string | null = searchParams.get("_id"); // 이용하려는 searchQuery
우선 req.url 을 URL 객체로 생성해줍니다.
searchParams.get("쿼리") 로 찾고자 하는 쿼리 값을 가져올 수 있습니다.
1~3까지를 반영해 제가 작성한 코드입니다.
import { connectDB } from "@/utils/db/db";
import { NextRequest, NextResponse } from "next/server";

// 게시물 정보를 불러오는 API입니다.
export const GET = async (req: NextRequest, { params }: Params) => {
  const { postId } = params;

  const db = (await connectDB).db("blog");
  const postCollection = db.collection("posts");
  const post = await postCollection.findOne({ id: Number(postId) }, { projection: { _id: 0 } });

  // 해당 게시물이 존재한다면 데이터와 status를 응답합니다.
  if (post) {
    return NextResponse.json(post, { status: 200 });
  }

  return NextResponse.json({ error: "Internal Server Error" }, { status: 500 });
};
POST로 요청한 body 데이터를 읽어들이려면 await req.json() 하면 됩니다.
import { connectDB } from "@/utils/db/db";
import { getToken } from "next-auth/jwt";
import { NextRequest, NextResponse } from "next/server";

// 새로운 게시물 작성 API 입니다.
export const POST = async (req: NextRequest) => {
  // 게시물 작성자 정보
  const token = await getToken({ req });

  // req 데이터
  const data = await req.json();

 //...

  if (result) {
    return NextResponse.json({ id }, { status: 200 });
  }

  return NextResponse.json({ error: "Internal Server Error" }, { status: 500 });
};
4. nextauth 적용 방법

기존에는 pages/api/auth/[...nextauth].ts 파일을 생성하는 방식을 이용합니다.
그런데, Next13 라우팅 규칙에 따라서 app/api/auth/[...nextauth].ts 를 생성해보면 다음과 같은 에러가 발생합니다.
- error No HTTP methods exported in 'C:\Users\d\Desktop\nextjsblog\blog\src\app\api\auth\[...nextauth]\route.ts'. Export a named export for each HTTP method.
원인: 기존 방식대로 따라했다면 authOptions를 내보내고 있기 때문입니다.
https://next-auth.js.org/getting-started/example#add-api-route
import NextAuth from "next-auth"
import GithubProvider from "next-auth/providers/github"

export const authOptions = {
  // Configure one or more authentication providers
  providers: [
    GithubProvider({
      clientId: process.env.GITHUB_ID,
      clientSecret: process.env.GITHUB_SECRET,
    }),
    // ...add more providers here
  ],
}

export default NextAuth(authOptions)
Next13에서는 GET또는 POST 요청을 내보내는 것이 규칙입니다.
공식 문서를 찾아보면 다음과 같이 handler를 GET 또는 POST 방식으로 내보낼 수 있습니다.
https://next-auth.js.org/configuration/initialization#route-handlers-app
import NextAuth from "next-auth"

const handler = NextAuth({
  ...
})

export { handler as GET, handler as POST }
제 코드에 적용한 결과입니다.
// next-auth 로그인 설정입니다.
export const authOptions: NextAuthOptions = {
  //...
};

const handler = NextAuth({ ...authOptions });

export { handler as GET, handler as POST };
이렇게 세팅을 해주면 새로운 라우팅 규칙으로 기존과 동일한 nextauth 동작을 수행할 수 있습니다..